Intro to background Jobs
Background jobs are used a lot in production. At first, the concept may seem complex or unclear why we are using it. So without a lengthy introduction let’s jump into action with a simple example.
Practice - Use case study
Let’s build a simple subscription application. This application allows users to submit their email addresses to receive some news. It’s not a complicated one and we can build the first iteration with some scaffolding, so let’s get started.
rails new subscription_list
rails g scaffold User name email
rails db:migrate
rails s
For convenience let’s set the root to point to Users#index
# config/routes.rb

Rails.application.routes.draw do
  resources :users

  root "users#index"
end
We have finished the first iteration. At this stage, try to create a new user and the feedback from the application is almost instantaneous.
Now we want to add a new feature, after the successful creation of a user, we want to send him an email. Some services offer a free tier for sending emails, if you are adventurous I encourage you to try it. But for the sake of this post, I will be a using my own service, don’t use it in production it’s slow and lazy 😁
# app/services/send_email_service.rb

class SendEmailService

  def self.call(email_address)
    sleep 20
    Rails.logger.info "=============================="
    Rails.logger.info "email sent to #{email_address}"
    Rails.logger.info "=============================="
  end
end
Then we simply call this slow service in the controller:
# app/controllers/users_controller.rb

def create
  @user = User.new(user_params)

  respond_to do |format|
    if @user.save
      SendEmailService.call(@user.email)
      format.html { redirect_to @user, notice: 'User was successfully created.' }
      format.json { render :show, status: :created, location: @user }
    else
      format.html { render :new }
      format.json { render json: @user.errors, status: :unprocessable_entity }
    end
  end
end
So, let’s refresh and try to create a new user, hmmm it took a while now. That’s fine for this iteration but as we care about the quality we need to offer a better version. The consequences of sending valid data through the creation form are:
- create a user
- notify a user about creation success
- send an email
It’s clear in our example that sending an email is the bottleneck here but should we send an email immediately after a user was successfully created? What if we can somehow send that email later? The answer to those questions is to use a background job.
Let’s generate our first job:
rails generate job send_email_job
# app/jobs/send_email_job.rb

class SendEmailJob < ApplicationJob
  queue_as :default

  def perform(email)
    SendEmailService.call(email)
  end
end
Finally let’s update the controller to use our new job:
# app/controllers/users_controller.rb

def create
  @user = User.new(user_params)

  respond_to do |format|
    if @user.save
      SendEmailJob.perform_later(@user.email)
      format.html { redirect_to @user, notice: 'User was successfully created.' }
      format.json { render :show, status: :created, location: @user }
    else
      format.html { render :new }
      format.json { render json: @user.errors, status: :unprocessable_entity }
    end
  end
end
Now, let’s create a new user. The creation process isn’t slow anymore and from the logs, we notice that after the user was created, the SendEmailJob was enqueued.
[ActiveJob] Enqueued SendEmailJob (Job ID: 3282b6d7-6992-413a-bafb-c90ce8459d05) to Async(default) with arguments: "test@test.com"
Then it was performed later
[ActiveJob] [SendEmailJob] [bafb] Performing SendEmailJob (Job ID: bafb) from Async(default) enqueued at 2019-10-20T08:24:35Z with arguments: "test@test.com"
...
[ActiveJob] [SendEmailJob] [bafb] ==============================
[ActiveJob] [SendEmailJob] [bafb] email sent to test@test.com
[ActiveJob] [SendEmailJob] [bafb] ==============================
[ActiveJob] [SendEmailJob] [bafb] Performed SendEmailJob (Job ID: bafb) from Async(default) in 20003.87ms
You can check this github repository for reference.
After seeing this example, we need to step back and understand how things work. The following diagram will help us to understand:
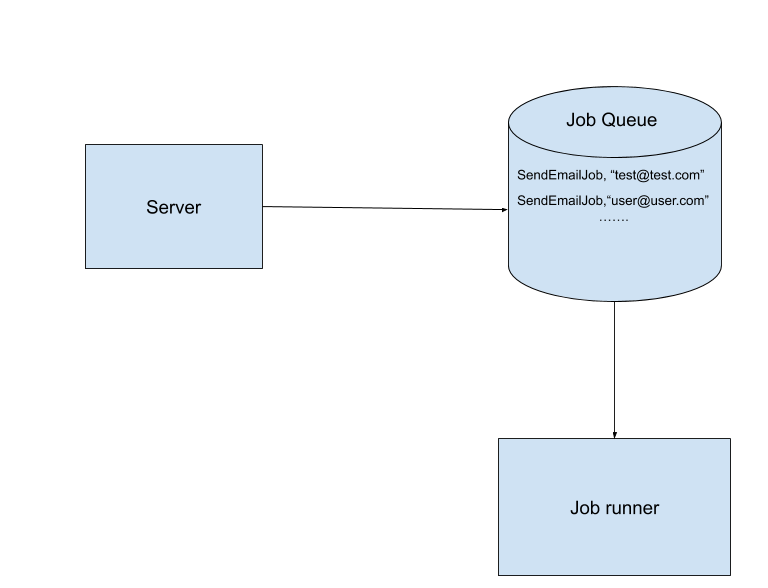 Background job diagram
Let’s start from the server block, it represents our Rails application. The interesting part here is ActiveJob, it was introduced in Rails v4.2 (changelog) and it represents a common interface for queuing systems, in other words, it makes our job much easier when it comes to switching to another queueing system.
Next, we move to the Job Queue block, we note that it stores the class name of the job and the arguments. Those values were persisted when we create a new user in our system. There are different formats for the Job Queue, it could be a database table, system memory,…
The last piece in this diagram is the Job runner, it watches the Job Queue for changes and runs the queued jobs based on the provided parameters (class name and method arguments). The Job runner runs on a separate process from the application server and in production, it’s mostly deployed to a separate instance.
It may help to think about the Job runner and Job Queue blocks as a single unit that runs in parallel to the web application. ActiveJob supports most of the queuing backends which are presented in this documentation.
Conclusion
We implemented our first background job and we have now understood how the background jobs work. To dive deeper, I invite you to check the ActiveJob guide and try to experiment with different queueing systems.